| WORKSHOPS Links:
Painting Flowers - Mandy Southan
Colour Mixing - Mandy Southan
Decorative Effects - Leonard Thompson
Dyeing Devores - Caroline Munns
Silk Choker Necklace - Linda Graves
Wax Melting Pots - Jill Kennedy
Gutta Pro-liners - Isabella Whitworth
Javana Air Pen - Isabella Whitworth
Microwave Dyeing - Vera Dreyfuss
Painting Borders - Tessa Barnes
Ten Top Tips - Jill Kennedy
Transferring designs - Anon
Free-style landscapes - Marianne Nash
Painted Silk Poppy - Mandy Southan
Magic Lettering - Leonard Thompson
Painted Lilies - Mandy Southan
The Silk Road - Mandy Southan
Aspects of Design - Leonard Thompson
Selling your work - Ian Bowers
Japan: Textiles - Mandy Southan
|
|
MICROWAVE DYEING - Vera Dreyfuss
In all microwave dyeing the silk fabric must be damp when placed in the microwave.
This method uses steam-fix dyes, some of which need vinegar to set the colour, others such as Rainbow Silks dyes and Arty's Quick Colour, don't.
Check your dyes and try a test piece before committing to a major work of art.


|
Scrunching
Wet the silk with water (vinegar water if using acid-fix dyes) and squeeze out. Scrunch up the piece of silk into hills and valleys, making sure that the edges are exposed. when dyeing this works best using only three or four colours. do not add too much dye or the colurs will not show up well when finished. Sprinkle or drip the dyes over the fabric until there is enough colour. scrunch the silk a little to mix the colours, but do not overdo this. Carefully place in a microwave container with a pierced lid. Microwave for 3-4 minutes depending on the amount of fabric. For pieces larger than one metre, increase the microwaving time.
Rinsing and washing
After microwaving, rinse the silk in cold water, then hot water, and finally cold water again, to remove the excess dye. The stronger colours (blues and purples) tend to lose more dye when rinsed. Finally wash the silk in soap suds, rinse, dry and iron damp.
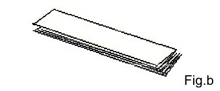
Pleating
Pleat the silk as shown in fig.a, until it is completely pleated, fig.b. It may be easier to pin the ends or iron the pleats at this stage. Otherwise wet the silk and squeeze out. Lay the fabric flat and apply the dyes longways or widthways along the strip of pleated silk. Turn over carefully to make sure the dye has penetrated through to the other side. If not, add more dye at this stage. Microwave as above.
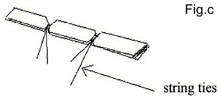
Pleat and tie
Pleat the silk and wet and squeeze as above. then tie the silk tightly at intervals with string. Apply dyes as required. Microwave as fig.c.
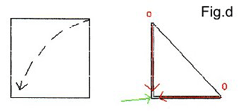
Triangle folding and tied
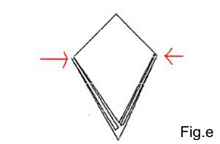
Fold a square of silk in half to make a triangle and then fold one of the corners marked with a circle in to meet the corner marked with an arrow, with the silk folded in a triangle in between the outer layers of silk, as shown in fig.d. Repeat with the other corner marked with a circle to produce the shape in fig.e.
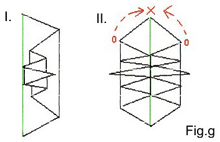
It makes life easier to iron the creases into the silk. Make evenly spaced marks along the horizontal axis in fig.f to prepare for folding. Fold in one of the corners marked with an arrow in fig. e past the middle vertical axis (fig.f) and fold backwards so that the fold is along the vertical axis and forwards and backwards, meeting at this line, to form pleats (fig.g1).
Repeat with the other corner to produce fig.g2.
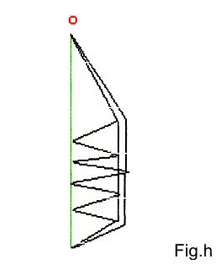
Fold in half along the vertical axis so that the points marked with circles meet the point marked with a cross. Iron in place.
You should finish with something like fig.h where the circle marks the position of the centre of the scarf. Tie string tightly round the silk in two or three places as shown by the dotted lines in fig.j (twisting the string lots of times to make it tight). Wet the silk, apply the dyes and microwave as above.
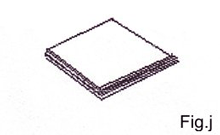
Folding into a square
Fold a square of silk in half, in half again and again until you have a small square of folded silk about 5x5cm. Wet the silk and squeeze out. Apply the dyes and microwave as above.
Twist and tie
The silk can be dyed before twisting and tying if desired. Twist a length of silk to form a rope. Then make knots in the rope at intervals, making the knots as tight as required. More effect is seen if the knots are made tightly. Wet the silk, apply the dyes and microwave as above.
Rinsing and washing
After microwaving, rinse the silk in cold water, then hot water, and finally cold water again, to remove the excess dye. The stronger colours (blues and purples) tend to lose more dye when rinsed. Finally wash the silk in soap suds, rinse, dry and iron damp.
Vera Dreyfuss
Many thanks to Dawn Ramsay of Rainbow Silks who demonstrated this at a Rainbow Playday. Link: www.rainbowsilks.co.uk
|
|
